House earthing is an integral component of every residential electrical system, functioning as a basic life-saving safety mechanism. It protects life and equipment by offering a low resistance path through which faulty currents may flow directly into the earth. Improper earthing could mean that the building is at a high risk of facing damage to property and equipment. This blog explores the technicalities of house earthing and its components, types, methods, installation procedures, and factors affecting its selection.
What is House Earthing?
House earthing means connecting all the electrical equipment in a building to earth. This ensures that in case of a fault, such as building insulation failure or short circuit, excess current is diverted safely into the ground to avoid damage to the occupants and the equipment.
Technical details of earthing include: it basically bestows a reference potential feel l(zero voltage) to an electrical system and helps protective devices like circuit breakers and RCDs operate. The resistance to earth must be less than one ohm for a residence.
Components of a House Earthing System
The residential earthing structure consists of various key elements which have a definite function towards the safety and the electrical continuity, and consists of;
- Earth Electrode: A GI (Galvanized Iron) or Galvanized Steel or copper rod/plate placed in the earth to carry current. It acts as an intermediary between the home’s electrical system and the earth.
- Earthing Lead (Main Earthing Conductor): This is the wire that connects the earth electrode to the electrical system, providing a path for faulty current to flow.
- Earthing bar: A strip (of copper or aluminium) in the main panel, which collects all earth connections from other circuits and devices and provides a central location for the grounding system.
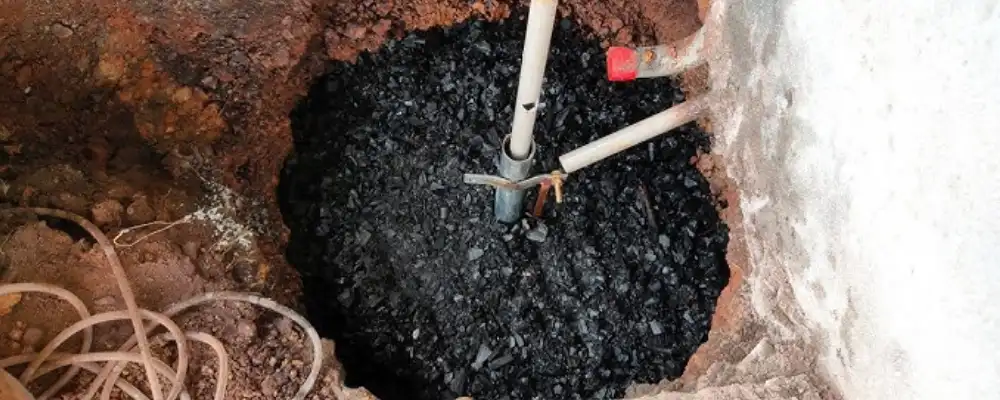
- Earth Pit: A pit containing earth, charcoal, and salt or earth-enhancing compounds. It lubricates the surface and decreases friction.
- Earthing Clamp and Lugs: These help in making a tight mechanical and electrical connection between conductors and the terminals or the electrodes.
- Protective Earth (PE) Conductor: A crucial element that connects the metallic parts of all electrical appliances that we actually touch with the earthing system to avoid fatal electric shocks.
These components must be installed in compliance with IS 3043:2018 standards and periodically inspected for corrosion, mechanical integrity, and resistance values.
Types of Earthing in Homes
The type of earthing chosen depends on the site conditions, load requirements, and safety codes. Common residential earthing types include:
- Plate Earthing: Plate Earthing:- Copper or GI plate (generally of 60 cm square x 6.35 mm thick, although size can increase or decrease as per soil conditions) is buried vertically in an earth pit filled with alternate layers of salt (loose) and charcoal. This is the favourite method in urban environments and provides good conductivity and longevity.
- Pipe Earthing: A vertical GI pipe (about 40 mm diameter and 2.5 to 3 m long) is erected in moist earth. It is the cheapest method of earthing and offers acceptable current dissipation for an average-sized home.
- Rod Earthing: Copper-bonded steel rods are inserted into the earth, usually in layers for deep penetration. It is perfect for rocky soil or high resistivity.
- Strip Earthing: Copper-bonded steel strips are inserted into the earth, usually in trenches for deep penetration. It is perfect for rocky soil or high resistivity.
Each type has its advantages and limitations, but all aim to provide a safe path for fault currents.
Methods of Earthing
Different earthing methods are adopted based on budget, durability, and soil resistivity:
- Conventional Earthing: This includes all the types mentioned above, in which GI or copper electrodes with charcoal and salt are used for soil conductivity to earth. This is a proven approach and with regular watering and occasional upkeep, provides reliable results.
- Chemical Earthing: Uses backfill compounds such as bentonite or marconite to ensure consistent low resistance. It minimises maintenance, is more stable over time, and is especially effective in arid or rocky regions.
- Maintenance-Free Earthing: Employs corrosion-resistant electrodes filled with conductive gel or compounds. These systems require little to no maintenance, offer long service life, and are preferred in modern electrical infrastructure for reliability.
Each method must be selected after conducting a soil resistivity test using the Wenner method to determine the effectiveness.
Step-by-Step House Earthing Installation Procedure
- Site Selection: Choose a location with good soil conductivity and sufficient moisture content. Avoid proximity to water pipelines or gas lines, and ensure accessibility for future inspections and maintenance.
- Excavation: Dig a pit based on the earthing type—typically 1.2 m x 1.2 m x 3 m for plate or chemical earthing. The pit must be of adequate depth to allow the electrode full contact with moist layers of soil.
- Electrode Installation: Insert the selected GI or copper electrode vertically in the center of the pit. It should be driven deep enough to make good contact with moist soil, and provisions for multiple rods may be made if high resistivity is observed.
- Backfilling: Surround the electrode with alternate layers of charcoal and salt for conventional earthing. In chemical earthing, use backfill compounds that retain moisture and ensure stable resistance over time.
- Watering Arrangement: Install a pipe or PVC funnel to facilitate regular watering. Periodic watering helps maintain consistent soil moisture levels, especially in conventional systems.
- Connecting Earthing Conductor: Use tinned copper, GI strips or wires to connect the electrode to the main earthing terminal. Ensure all connections are tight, corrosion-resistant, and tested for continuity.
- Earthing Busbar Connection: Route the conductor securely into the building’s main distribution panel and fix it to the earthing bar. Proper tagging and insulation must be followed to meet code requirements.
- Testing: Use an earth resistance tester or digital megger to verify that the system resistance is within prescribed limits. Testing should be done under dry and wet conditions for accurate evaluation.
- Earthing Chamber Covering: Seal the pit with a durable RCC or plastic cover. Provide an inspection chamber with a removable lid to facilitate periodic checks without excavation.
Proper labeling and documentation should accompany the earthing installation as per local code requirements. It is advisable to hire electricians or similar construction professionals to ensure that a house wiring system is effective and safe.
Factors to Consider While Choosing Earthing Systems
- Soil Resistivity: Soil composition significantly affects the choice of earthing system. High-resistivity soil may necessitate deeper rods, chemical compounds, or multiple electrodes.
- Load Characteristics: For buildings with heavy electrical appliances or HVAC systems, a low-impedance and stable earthing system is critical to ensure quick fault dissipation.
- Climate and Moisture Content: Where the rainfall is minimal or conditions are arid, there is a need to implement systems that have moisture retention ability or employ chemical earthing for stability.
- Space Availability: In compact urban plots, vertical systems such as rod or pipe earthing are suitable, but for bigger properties, strip or grid earthing may be more ideal.
- Budget Constraints: Although traditional systems have low upfront costs, maintenance-free earthing, although costly, offers long-term cost savings through its operation and reliability.
- Compliance Standards: IS 3043 and the National Electrical Code (NEC) specify standards for the design, material, and practices of installation to ensure safety for humans and equipment.
A professional site survey and resistivity analysis are recommended before finalising the system.
Conclusion
House earthing is not just a rule to be complied with—it is lifesaving infrastructure that needs to be designed and installed carefully. An effective earthing system guarantees individual safety, guards against appliances, and ensures proper functioning of protection devices. Property developers, electric consultants and homeowners need to accord the same level of importance to earthing as any fundamental utility.
Frequently Asked Questions (FAQs)
Residential earthing resistance should be less than 1 ohm. This is for effective fault current dissipation and protection of the system. Anything greater than this requires corrective action or system improvement.
It is recommended to check the earthing system every 6 to 12 months, particularly prior to and following the monsoon period. Periodic checks detect corrosion, breaks in contact, or excessive resistance owing to soil shifts.
Chemical earthing has stable performance and less maintenance, particularly in arid or rocky environments. But it’s more costly compared to traditional systems. It is best suited to areas with low soil conductivity and where long-term stability is of paramount importance.
Though homeowners can take a chance at installing it on their own, it is advisable to hire a licensed electrician or electrical engineer to adhere to IS standards and safety measures. Incorrect installation exposes one to life-threatening dangers.
IS 3043:2018 is the standard of practice in India that includes design, installation, and testing procedures for earthing. All domestic and commercial installations are required to meet the requirements of these standards.